- Date
06.08.2020―09.15.2020
- Location
JAPAN HOUSE Los Angeles YouTube channel
- Fee
Complimentary
Flower arrangement has a long history in Japan, and a new wave of Japanese designers around the world are bringing these traditions to life in fresh ways. In this virtual workshop, Mitsuko Osuga from Mitsuko Floral will introduce the basic concepts of Japanese flower arrangement, such as considering color, balance, perceived weight, and directional flow between elements. She’ll guide viewers in creating their own unique arrangement inspired by spring, and share an insider’s trick: how cellophane tape can transform even a common kitchen bowl into the ideal flower vessel. This tutorial requires some simple materials that can be found around the house, or safely obtained in your local supermarket or gardens. If you happen to have a Japanese-style ceramic in your home, such as a tea bowl, ramen bowl, or other low shallow vessel, she’ll illustrate ways to highlight Japanese aesthetics in the arrangement as a whole, but any type of small vessel is suitable for the workshop.
Please take a few minutes to complete a survey. Your responses will help us improve our future programming.
Take the SurveyMaterials
- Simple shallow plate or cereal bowl
- Scissors
- Cellophane tape
- Two Types of Flowers
- Greenery
- Simple branches and twigs from the yard

Vessel Selection Tips
Choose a simple shallow plate or cereal bowl, ideally with an inch and a half to two inches of depth.
Vessels with wide and open necks are preferred in Japanese-inspired arrangements as it is believed that oxygen can more readily reach the stems which helps prolong the life of the flowers.
Vases with soft pastel shades are also common in Japanese-inspired arrangements. Bronze vases are especially popular because they are thought to resemble natural elements of mother earth and enhance the beauty of flowers.

Step 1 | Taping the Dish
Taping is an important technique to anchor the flowers within the dish/bowl. In place of green floral tape, everyday cellophane tape can be used.
Tape half of your dish from one side to the other, edge to edge. Repeat this vertical tape line on the left side of the original center tape 2 or 3 more times depending on the size of your plate. Then using shorter pieces of tape, tape vertically as to create grid lines across, keeping the tape taut. Repeat until you cover one side of the dish completely with a grid of tape.


Floral Selection Tips
Asymmetry is an important component within Japanese-inspired arrangements, so please choose two types of flowers that are seemingly opposites of each other. We’ll use yellow roses and purple tulips in our sample to contrast two very different colors and styles of flowers – one that is weighted and strong, and another that is light and flowy. These distinguishing differences are thought to maintain balance and accentuate beautiful lines.

Step 2 | Watering the Dish
Add water to the dish
If you’d like, add a copper penny to the water. The copper is thought to prevent the growth of bacteria in water and extend the life of your flowers.

Step 3 | Add the Greenery
Cut your greenery stems and insert them one by one into the squares of your grid. Start with a center square and work your way towards filling the outer grids. Make sure the stems are in the water.

Step 4 | Insert Flower 1
Cut your “heavier” flower, in this case the roses, so you have about two inches of stem under the flower head and insert it one by one into the squares of your grid through the greenery.
Start with a center grid and keep your flower bloom facing up. This is to represent the part of the plant growing towards the sun.
Then, work your way towards filling the outer grids with blooms facing outwards.


Step 5 | Insert Flower 2
Take your second “lighter” flower, here the tulips, and trim the bottom. Insert it into a square grid from the side at an angle and let it naturally fall towards your working table, face down.
Tulip heads can droop initially as they bloom during the day and close at night. Their necks will naturally grow towards the light and you will see a difference in their direction in just a day or two!
Pro Tip: Cut a thin, ¼” vertical slit in the neck of the tulip (the stem right under the bloom) to make your tulips last even longer.


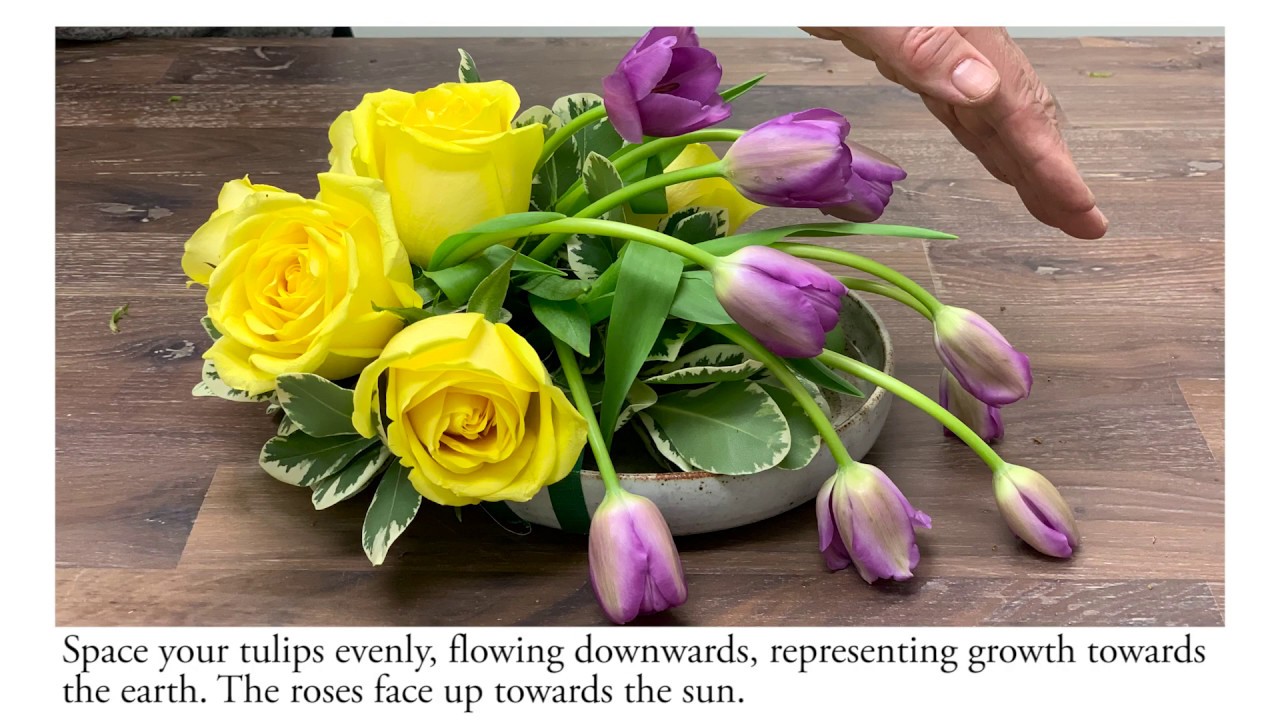
Step 6 | Rearrange Tulips
Rearrange your tulips to ensure they flow downwards as this line is the part of the plant that is growing towards the earth. With the contrast of the roses facing up towards the sun, and the tulips growing towards the earth, the arrangement is thought to be complementary and in perfect balance.

Step 7 | Insert Filler Branches and Twigs
Flowers comprise so much more than just the blooms themselves and encompass all growing things – branches, twigs, foliage, moss, etc. Find some loose branches in your yard to incorporate this thought into your arrangement and refine the asymmetrical look and balance of your centerpiece.

Complete!
Now that you’ve made something beautiful, be sure to notice the subtle changes every day as the flowers continue to bloom and transform, taking on a new directions and shape.
The next morning, see how your tulips are reaching for the sun!

Instructor Profile
Mitsuko Osuga
Mitsuko Osuga is the owner and chief designer of Mitsuko Floral, a premier wedding/event floral design studio and school in Torrance, California. She is a master floral designer with over 25 years of professional experience in Tokyo, New York City, and Los Angeles. After graduating from Waseda University in Tokyo, she received a degree in floral design (1988) and certification as a professional floral instructor (1992) from Parsons The New School for Design in New York. She is a recipient of numerous industry awards, including the Wedding Wire’s Couples’ Choice Awards, and has been recognized in The Knot’s Best of Weddings. She was also recently inducted into The Knot’s Hall of Fame. Osuga’s work has been covered by a wide range of print and media outlets, including Ceremony magazine, various wedding and fashion blogs, special wedding programs on Fox and ABC, and several Japanese magazines and newspapers such as Japan Up!, Lighthouse, and Nikkan Sun.